Welcome to the official homepage of enLARGE, the iOS app that lets you use your iPhone, iPod touch and iPad as a Predictive Exposure Computer with your traditional analog darkroom optical enlarger
enLARGE is a new app that lets you accurately and conveniently compute the exposure time needed to expose one or more differently sized larger enlarger-exposed enlargements based on the exposure time found to be correct for the exposure of a smaller preliminary enlargement made first from the same negative.
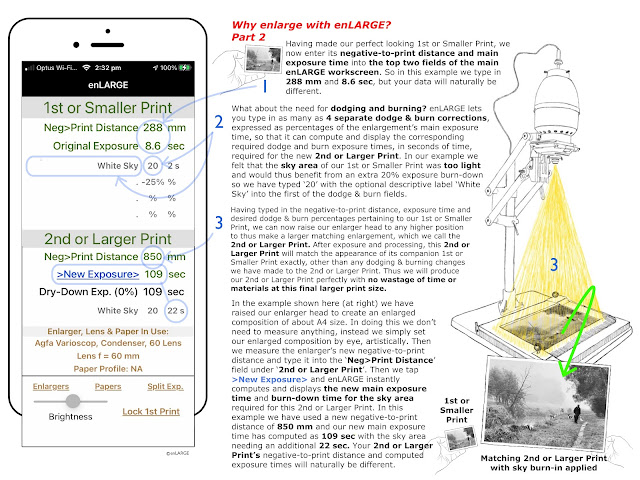
When you use enLARGE, you'll typically begin by first making a small perfect trial enlargement, called the 1st or Smaller Print, at any small size of your choice above 1X enlargement magnification, thus the projected image will be the same size or larger compared to its source negative. When this small trial enlargement looks correct in its exposure and contrast, you'll then type its exposure time, together with the enlarger’s negative-to-print distance, and as many as four desired dodge & burn exposure percentages, into the enLARGE work screen. You can now raise your enlarger's head to any higher height, or variety of higher heights, to thus expose one or more larger replica enlargements of any various sizes. To make a new larger enlargement, you'll type the enlarger's new negative-to-print distance into the enLARGE work screen and then tap '>New Exposure>'. enLARGE will instantly compute and display the new main exposure time, together with any associated new required dodge & burn exposure times, required to expose the new larger enlargement, such that after processing it will perfectly match the appearance of the smaller initial trial enlargement, the only difference between the two enlargements being their size and any dodge & burn effects which you may have chosen to apply to the 2nd or Larger Print. enLARGE also computes a secondary shorter dry-down exposure time, which compensates for the tendency for some print papers to dry down to a darker appearance, and also helps you to manage split exposures in which the main exposure time is given to the print using a sequence of 2 or more shorter consecutive equal exposures.
enLARGE works with all types of traditional lens-equipped darkroom enlargers including those fitted with Condenser, Diffusion, Cold-Light Grid, Dichroic, Multigrade, Adjustable Condenser & Negative Stage, and LED-panel lamphouses.
enLARGE works with all kinds of contrast and filtration control, including in-drawer filter gels, below-lens filters, dichroic and multigrade heads. It works with neutral density filtration and enlarging lamp dimmers. It works with split-grade printing and split-exposure printing. However, do not use enLARGE with polarizing filters, or variable neutral density filters which incorporate polarizing filters, as these will give erroneous results, as polarizing filters transmit differing amounts of light under the differing optical geometries which are found in an enlarger at different enlargement sizes.
enLARGE works with both vertical and horizontal enlargers using negative formats of all sizes, eg. with negative formats of 8x11mm to 11x14” and beyond, and with enlarging lenses of all focal lengths, eg.15mm to 680mm and beyond, including wide-angle enlarging lenses.
enLARGE works at all magnifications above 1X, thus when the projected image is the same size as its source negative or larger. enLARGE does not compute enlargement reductions, thus below 1X. enLARGE does not incorporate or use preset print sizes, formats or shapes, instead you can use enLARGE at any and all enlargement magnifications above 1X, with no upper limit.
When using enLARGE you never need to measure the size of your film negative or projected image, or compute the magnification of your projected image. Instead you simply measure the enlarger’s negative-to-print distance using a metric tape measure, or for greater distances or with horizontal enlargers, a laser measure, and enLARGE makes its computations using this value.
Due to the way enLARGE is typically used in the enlarging process, there is typically no need to use it in a ‘lights-out’ darkroom condition, and thus there is no need to switch on the light-emitting screen of your iPhone, iPod touch or iPad which in turn could affect light sensitive materials. Instead you will typically use enLARGE in white-light conditions when assessing 1st or Smaller test prints at the wet tray or drying station.
enLARGE displays exposure times to one decimal place (eg. 2.3 sec, 87.9 sec) for exposures up to 100 seconds, and then in whole seconds over 100 seconds, with no upper exposure time limit. It displays associated dodge & burn exposure times required for each current enlargement in whole seconds, rounded up to the nearest whole second. Negative-to-Print Distances can be entered as either whole millimeters or as millimeters to one or more decimal places.
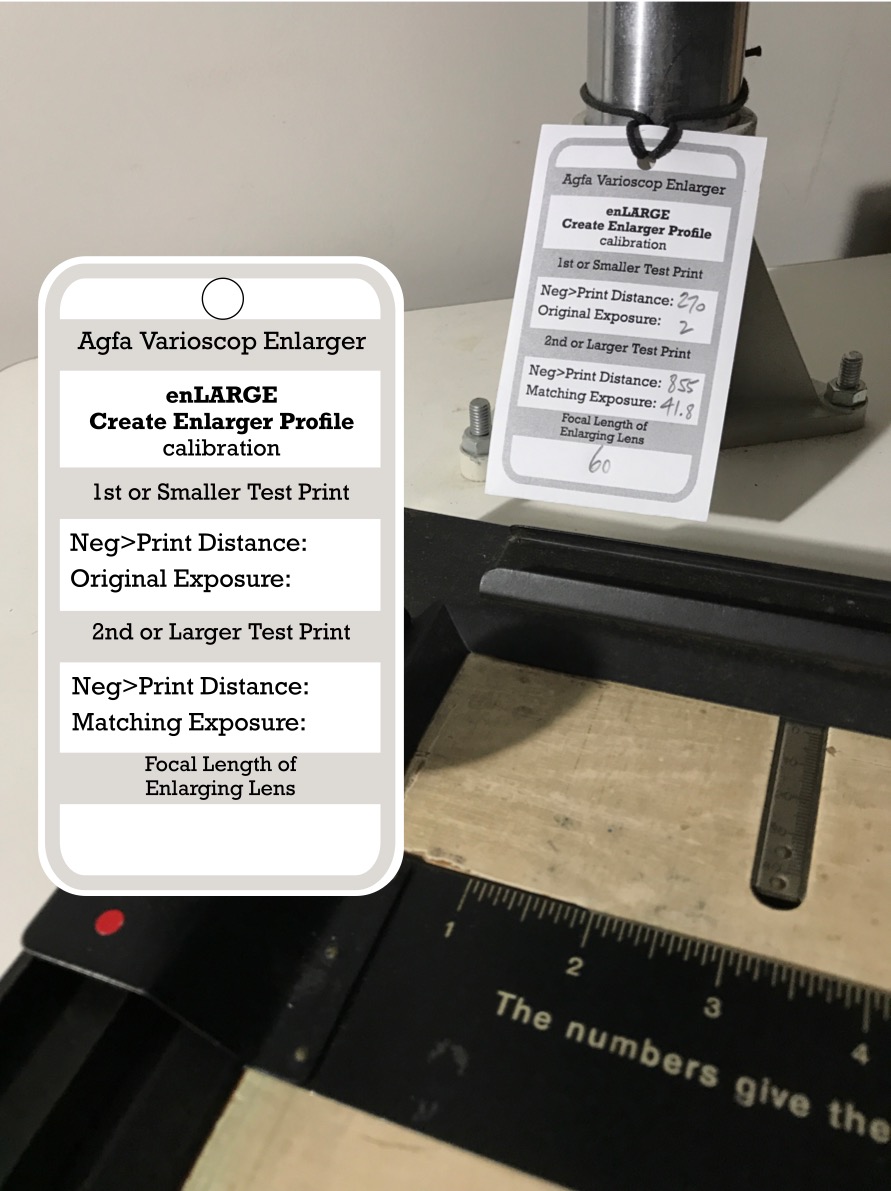
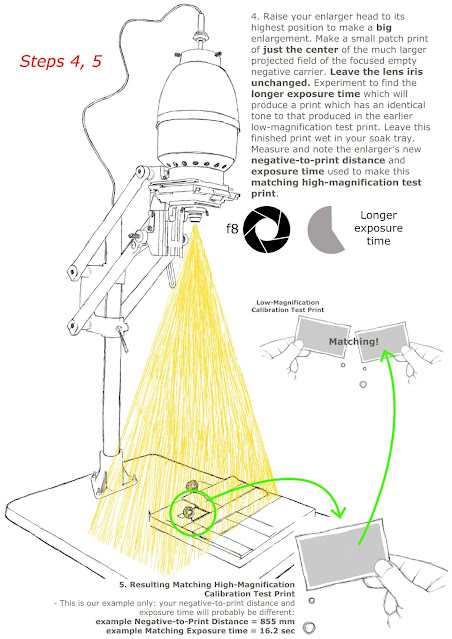
Prior to use, enLARGE requires calibration to at least one enlarger in order to work accurately with it. During the calibration process enLARGE records the unique light emission characteristic of your enlarger-and-lens combination and stores it as an enlarger calibration profile which it then uses to perform the most accurate predictive exposure computations for the making of enlargements of all various different sizes with the equipment. enLARGE stores an unlimited number of such enlarger profiles so that you can conveniently use it with any number of different enlargers or enlarger assemblies. Note that because enLARGE records the relativebrightness difference of your enlarger at different magnifications, only one calibration profile is needed for use with each so-calibrated enlarger. Thus it isn’tnecessary to create separate or different profile calibrations for use with different materials or illumination contrast settings.
Provided that enLARGE is accurately calibrated to the enlarger in use, according to the instructions explained in this blog, it has no error. Thus variously sized enlargements made using enLARGE, from any one negative, can be made to match each other identically in their tonality, contrast and overall 'look' and appearance, the only visible difference between them being their relative sizes. enLARGE can also be calibrated with any desired bias, thus, for example, that all enlarged prints dry to look eg. +10% darker than their smaller trial enlargements, or 5% lighter, etc.
Purchase price, payable when purchasing enLARGE on the Apple App Store, supplies the full app for permanent use. There is nothing else to pay, purchase or add. enLARGE does not carry any advertising or promotional content, and it does not ask you to make any further purchases. All future upgrades are provided free of charge, simply download them from the Apple App Store as they become available.
enLARGE has been developed by Andrew G. Wittner, Dip. Art & Design, Photography, PCAE, Melbourne Australia, a Master Darkroom Printer and enlarger operator with over 45 years of darkroom enlarging experience, and Soan K. S. Saini, a university trained professional programmer and specialist in Apple iOS coding, both of Melbourne, Australia. It was launched on the Apple App Store in June 2017 and at July 2021 has users in over 20 countries. It runs on iPhone, iPod touch and iPad using iOS 9 and higher, and is not available on any other computing platform.
Contact and support: Contact enLARGE using email andrew.wittner.photography@gmail.com.
Using enLARGE in a communal darkroom where several users share several different enlargers
Troubleshooting enLARGE: What to do when 1st or Smaller Prints and 2nd or Larger Prints don’t match
Using enLARGE with SPLIT-GRADE PRINTING
Split-Grade printing lets you control the contrast of a black & white enlargement by exposing it through a sequence of two or more different contrast filters. For example, instead of simply exposing a black & white silver-gelatin enlargement for, say, 10 seconds using a medium-contrast Grade 2.5 filter, you could achieve a similar, or perhaps a slightly different result, by exposing it for, say, 4 seconds with a low-contrast Grade 0 filter, followed by 6 seconds with a high-contrast Grade 5 filter. Split-grade printing thus allows a more variable degree of contrast control, and it also allows you to expose different parts of the image using different contrast filters.
To use enLARGE with split-grade printing, begin in the usual way by producing a small perfect split-grade 1st or Smaller Print without using enLARGE at all. This will typically result in a split-grade 1st or Smaller Print which has two exposure times, eg. one of 4 seconds and one of 6 seconds, thus a separate exposure time for each of, say, two controlling filters. Now to use enLARGE to make a matching larger 2nd or Larger Print, you will perform the enLARGE computation for it twice: once using eg. 4 seconds in the 1stor Smaller Print'sOriginal Exposurefield and then by repeating the computation using eg. 6 seconds in it instead, to thus generate twonew2nd or Larger Print >New Exposure>times, thus one for use with each of the two controlling filters when exposing the larger enlargement.
A video on YouTube titled ‘Printing a Difficult Negative with enLARGE’, by Andrew G. Wittner, demonstrates the production of a split-grade enlargement using enLARGE.
Using enLARGE to record printing data
By saving a snapshot of the main enLARGE work screen to your device’s camera roll, you can record details of your enlarging work. In the example shown below, a series of two screenshots of the entire main enLARGE work screen has been saved to the iPhone’s camera roll, and then a third snapshot of the corresponding enlargement itself, whilst in the fixer or wash tray, has been recorded also to further assist picture identification and to record its appearance. Note also that one of the main enLARGE work screen’s dodge & burn label fields has been used instead to record a title or description for the relevant image. Recording such data to your camera roll can be useful if you wish to print the image again at a later date, as it gives you basic setup info including print sizing, main exposure time, dodge & burn data, choice of enlarger, lens and paper stock, which can thus help you to later replicate or work on the print.
Batch Processing with enLARGE
Note that when producing a set of several differently sized enlargements from the one negative using enLARGE, that you may be able to batch process a complete set of enlargements in the one go. This means that you will process all of the prints together in your consecutive trays as a single batchof prints instead of processing just one print at a time. This can save processing time and will typically also ensure the most perfect visual uniformity across all of the prints in the set.
Operating enLARGE in reverse mode
enLARGE is designed to compute from small to large. This means that you will get the most perfect predictive computational accuracy from it when the 1st or Smaller Print is actually the smallest enlargement in any particular set, and all other 2nd or Larger Prints are actually larger than it. If you use enLARGE in reverse mode, which means that the 1st or Smaller Print is bigger than the 2nd or Larger Print, (for example, if you are predictively computing the exposure time needed for a smaller enlargement after first successfully printing a larger enlargement without using enLARGE) then you will find the result to be generally quite satisfactory, but possibly not quite as perfectly accurate as when enLARGE is used from small to large as originally intended by its processing algorithms. Thus for best results with enLARGE, remember to make the 1st or Smaller Print the smallest in the set.
Using enLARGE in a communal darkroom where several users share several different enlargers
Once an enlarger has been calibrated for use with enLARGE then its calibration data, as typed into enLARGE’s Create Enlarger Profile screen, can be shared amongst other darkroom workers who also hold a copy of enLARGE on their iPhone, iPod touch or iPad, so that they too can use the equipment with their copy of enLARGE.
Troubleshooting enLARGE: What to do when 1st or Smaller Prints and 2nd or Larger Prints don’t match
The essential function of enLARGE is to compute and supply accurate matching exposure times for enlargements of various sizes, based on the calibration that you prepare for it. Specifically, the 2nd or Larger pictorial Print should identically match the 1st or Smaller pictorial Print when both prints have had identical processing and are similarly wet at the water holding tray, and also after both prints have dried. If you find that a 2nd or Larger Print doesn't match the appearance of its companion 1st or Smaller Print, then consider these issues:
Are you using the correct enlarger calibration profile for the equipment in use, or are you mistakenly using a calibration profile that belongs to a different enlarger setup? Check to make sure you are using thecorrect matching enLARGE calibration for the equipment in use including the use of any supplemental diffusion boxes and/or condenser lenses, and that the correct enlarging lens is in place.
If you add an Anti-Newton Glass to the underside of the condenser in a Leitz Focomat l enlarger then this may affect the performance of the calibration because it causes the condenser lens to sit higher up in the lamphouse. If this causes a noticeable error in the matching exposure of a 2nd or Larger Print, you can correct it by editing the Matching Exposure value in the enlarger’s Create Enlarger Profile screen to a slightly higher or lower value as required. Alternatively a new calibration profile can be created and stored for use with the Anti-Newton Glass in place.
If you recently changedtheenlarging lamp, did you replace it with a lamp of thesame physical size and did you replace it in thesame physical position? If you replaced the lamp with one of a different size and/or you reinserted it in a different position, then this can affect the performance of the calibration. In all of these situations an erroneous calibration can be corrected by editing the Matching Exposure value in the enlarger’s Create Enlarger Profile screen to a lower or higher value as required and then re-saving the profile. See ‘1. The Create Enlarger Profile Screen’ in the page “The 6 Screens of enLARGE: What they do and how to use them” in this blog for details on how to adjust the exposure level of a calibration profile.
Are you using in the light path a variable neutral density filter which thus incorporates a polarising filter? If so, this will give an erroneous result in the 2nd or Larger Print, as polarising filters pass differing amounts of light in the differing projection geometries found in enlarging. Thus variable neutral density filters which incorporate polarising filters should not be used.
Are you using the same stock of print paper to make all of the different prints in your set? Different batches of print paper may have different emulsion speeds which will affect resulting print tonality.
Is your paper developer exhausted? If you produce a larger 2nd or Larger Print and it appears dramatically too light compared to its smaller companion 1st or Smaller Print, then it may indicate that your paper developer is exhausted. It had enough energy to fully process the smaller 1st or Smaller Print, but not enough to process the larger 2nd or Larger Print. In this situation you need to replace or replenish your developer and then retest again by making a new 1st or Smaller Print followed by any desired 2nd or Larger Print/s.
Whilst exposing the 1st or Smaller Print, are you using an excessively short exposure time, and/or did your enlarger lamp suffer a mains power dropout or fluctuation?The use of a very short exposure time when exposing the 1st or Smaller Print, eg. a fraction of second, and/or the occurrence of a mains power fluctuation during a very short exposure, may prevent the enlarger lamp from achieving full brightness for a sufficiently long time (the lamp’s ‘rise time’) and this will have the final effect of producing a 2nd or Larger Print which appears too dark in comparison to its 1st or Smaller Print. If not using power stabilisation equipment, it's good practice to use exposure times of at least a few seconds for your 1st or Smaller Print.
When comparing a companion smaller 1st or Smaller Print and larger 2nd or Larger Print made from a film negative, you should be wary of what we call the ‘open grain’ effect, which is the tendency for flat, plain tones in larger enlargements to appear very fractionally lighter than their appearance in their smaller companion 1st or Smaller Print when the two prints are compared side by side. This occurs because in the larger 2nd or Larger Print the image's more greatly enlarged grain structure is easier to see and it introduces a patterned lightness into a flat tone which is not visible in the smaller print. (It is this effect which leads to the erroneous belief that the contrast of an enlargement changes with its magnification, whereas in fact it does not, as enLARGE will demonstrate to you in use. You will find when using enLARGE that print contrast remains identical at all enlargement magnifications provided that tonal density is kept identical, which enLARGE will achieve for you provided that its calibration has been accurately set.) Thus if the larger 2nd or Larger print is placed further away from the viewer so that it appears visually to be the same size as the smaller print, the latter which is thus held closer to the viewer, then the two tones will appear identical again. For this reason we recommend that you compare other, more complex tones also when judging the accuracy of printed results with enLARGE, and we also recommend, for the same reason, that calibrations and adjustments be made without using a film negative in the negative carrier.
Note that changing the negative carrier (in its size or format, or to one of glassed or glassless construction) and/or the contrast and/or neutral density of lighting or filtration in the lamphouse or below the lens, will have no effect on calibration performance. Similarly a lamp dimmer can be used with enLARGE provided of course that the same brightness setting is used for the production of all prints in a particular set.
If you have any further queries or problems with enLARGE which are not addressed here, please contact Andrew Wittner using email andrew.wittner.photography@gmail.com. Thanks and good luck with your enlarging!
enLARGE works with a total of 6 screens. The following diagrams illustrate them, approximately in the order in which they appear when you first use it, and explains what they do and how to use them:


 Using enLARGE in a communal darkroom where several users share several different enlargers
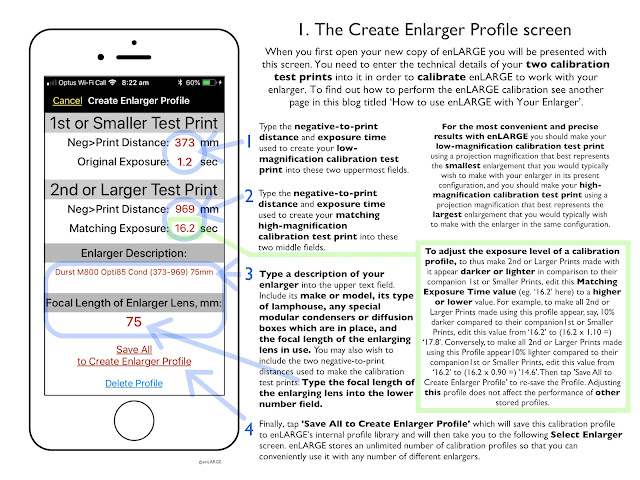


